Introduction
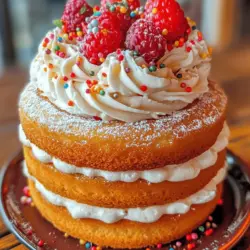
There’s something undeniably comforting about a slice of classic vanilla cake. This timeless dessert has held its place in kitchens around the world, bringing joy and sweetness to countless celebrations and gatherings. Whether it’s a birthday party, an anniversary, or simply a cozy family dinner, vanilla cake is a go-to choice that never fails to impress. Its light, fluffy texture and subtle sweetness make it a versatile base for various frostings and fillings, allowing home bakers to get creative while still adhering to the classic flavor profile.
In this article, we’ll delve into the recipe for what many consider to be “The Best Classic Vanilla Cake.” This recipe is designed for bakers of all skill levels and promises a delightful cake that’s perfect for any occasion. With the right ingredients and techniques, you’ll create a cake that is not only delicious but also visually appealing, ensuring it shines at the center of your table.
Understanding the Classic Vanilla Cake
Historical Context of Vanilla Cake
The roots of vanilla cake can be traced back to the 19th century, a time when cakes began to evolve from dense, bread-like structures to the lighter, fluffier versions we enjoy today. The introduction of baking powder revolutionized home baking, allowing cakes to rise and achieve that perfect, airy texture. Vanilla, derived from the pods of the vanilla orchid, has long been a beloved flavoring agent, first cultivated by the Totonac people of Mexico and later brought to Europe. Its warm, aromatic essence has made it a staple in many dessert recipes, particularly cakes.
As culinary traditions spread and evolved, the vanilla cake became a symbol of celebration, often gracing tables during special occasions. Its simplicity and elegance make it a favorite among bakers, and it has remained a timeless choice for generations. In a world filled with extravagant flavors and complex desserts, the classic vanilla cake stands out for its purity and sophistication.
Popular Occasions for Serving Vanilla Cake
Vanilla cake is a versatile dessert that fits perfectly into various celebrations. It is a common sight at birthday parties, where it is often adorned with colorful frosting and decorations to match the theme of the event. Weddings frequently feature vanilla cake, either as the main cake or as a layer in multi-tiered creations, symbolizing purity and simplicity.
Other occasions where vanilla cake shines include baby showers, graduations, and holiday gatherings. Its ability to serve as a blank canvas allows it to be customized for any event, accommodating different tastes and preferences. From classic buttercream frosting to fruit fillings and chocolate ganache, the options are endless, making vanilla cake a beloved choice for both bakers and dessert lovers alike.
The Appeal of Classic Flavors in Modern Baking
In today’s fast-paced world, where food trends come and go, there is a growing appreciation for classic flavors. The simplicity of a well-made vanilla cake resonates with many, providing a sense of nostalgia and comfort. In an era where elaborate desserts are often the norm, the vanilla cake serves as a reminder that sometimes, less is more.
Home bakers are increasingly drawn to traditional recipes that prioritize quality ingredients and straightforward techniques. The Best Classic Vanilla Cake is not just a recipe; it is a celebration of timeless flavors and the joy of baking at home. As we move through the steps of this recipe, you’ll find that creating a classic vanilla cake is not only rewarding but also allows you to connect with a rich culinary heritage.
Ingredients Breakdown
Creating the perfect vanilla cake begins with understanding each ingredient’s role in the recipe. Here’s a detailed breakdown of the components that contribute to the cake’s delightful flavor and texture:
– All-Purpose Flour: This is the backbone of your cake. All-purpose flour provides the necessary structure and texture to the cake. It contains a moderate amount of protein, which helps develop gluten when mixed, giving the cake its desired lightness while still maintaining a tender crumb.
– Baking Powder: As a leavening agent, baking powder is crucial for helping the cake rise. It reacts with moisture and heat, producing carbon dioxide bubbles that create lift in the batter. This results in a fluffy cake that doesn’t feel dense or heavy.
– Unsalted Butter: Butter plays a dual role in this recipe. Not only does it add richness and flavor, but it also contributes to the cake’s moisture content. Using unsalted butter allows you to control the salt levels in your cake, ensuring a balanced flavor.
– Granulated Sugar: Sugar is essential for sweetness, but it also impacts the cake’s texture. It helps to create a tender crumb by inhibiting gluten formation, resulting in a softer cake. Additionally, sugar aids in the browning process during baking, contributing to the cake’s golden exterior.
– Eggs: Eggs are vital for binding the ingredients together and adding moisture. They help with emulsification, ensuring that the fat and liquid ingredients combine smoothly. The proteins in eggs also assist in the cake’s structure as it bakes.
– Pure Vanilla Extract: This is the star flavor of your cake. Pure vanilla extract enhances the overall taste and aroma, giving the cake its signature flavor. Using high-quality vanilla extract makes a noticeable difference in the final product, elevating the cake from ordinary to extraordinary.
– Whole Milk: Milk adds moisture and richness to the batter, influencing the cake’s density and texture. It also helps dissolve the sugar, allowing for a smoother batter. Whole milk is preferred for a richer flavor, but you can substitute it if necessary.
– Optional Almond Extract: While not required, a splash of almond extract can add a delightful complexity to the flavor profile. It pairs beautifully with vanilla and can elevate the overall taste of the cake, providing a unique twist on the classic recipe.
Equipment Needed
To successfully bake The Best Classic Vanilla Cake, you’ll need some essential baking tools. Having the right equipment on hand will make the process smoother and more enjoyable. Here’s a list of what you’ll need:
– Mixing Bowls: A set of mixing bowls in various sizes will help you measure and combine your ingredients effectively.
– Electric Mixer or Whisk: An electric mixer will save time and effort when creaming the butter and sugar, but a sturdy whisk can also do the job if you prefer a more hands-on approach.
– Measuring Cups and Spoons: Accurate measurements are crucial in baking. Invest in a good set of measuring cups and spoons to ensure precision in your ingredient quantities.
– Spatula: A rubber spatula is essential for scraping down the sides of the mixing bowl and ensuring that all ingredients are well combined.
– Cake Pans: You will need two 9-inch round cake pans for this recipe. Make sure they are greased and lined with parchment paper for easy release after baking.
– Toothpick for Testing Doneness: A simple toothpick will help you check if your cake is done. Insert it into the center of the cake; if it comes out clean or with a few crumbs attached, your cake is ready.
With a clear understanding of what makes a classic vanilla cake special, the ingredients that bring it to life, and the necessary tools to create it, we are well on our way to baking a delightful treat that pays homage to a beloved culinary tradition. In the next part of this article, we will dive into the step-by-step instructions for making The Best Classic Vanilla Cake, ensuring that each bite is as delicious as the last.
Cooling Rack
After baking the perfect classic vanilla cake, it’s essential to allow it to cool properly to achieve the best texture and flavor. Once your cakes are out of the oven, transfer them to a cooling rack. This process ensures that air circulates around the cakes, preventing them from becoming soggy and allowing them to set without steaming.
Step-by-Step Instructions
Preheating the Oven: Importance of Correct Temperature
Before you begin mixing your ingredients, preheat your oven to 350°F (175°C). Preheating is a crucial step in the baking process as it ensures that your cake cooks evenly. A properly heated oven helps the leavening agents in your batter activate at the right time, creating a light and fluffy texture. An oven thermometer can be handy to confirm that your oven reaches the desired temperature.
Preparing the Pans: Greasing and Lining for Easy Removal
While your oven is preheating, prepare your cake pans. You’ll need two 9-inch round cake pans for this recipe. Start by greasing the pans with butter or cooking spray, ensuring that every surface is coated to prevent sticking. For the best results, line the bottom of each pan with parchment paper. This extra step guarantees an easy release after baking and helps maintain the cake’s shape.
Mixing Dry Ingredients: Techniques for Even Distribution
Next, gather your dry ingredients: all-purpose flour, baking powder, and salt. In a large bowl, whisk together these ingredients thoroughly. This step is vital as it ensures that the leavening agents are evenly distributed throughout the flour, allowing for an even rise during baking. Sifting can also be beneficial if your flour is lumpy or you want to incorporate extra air for a lighter cake.
Creaming Butter and Sugar: Achieving the Perfect Light and Fluffy Texture
In a separate bowl, it’s time to cream your butter and sugar. Using room temperature unsalted butter (about 1 cup or 226 grams), beat it with 1 cup (200 grams) of granulated sugar using an electric mixer on medium speed. This process should take about 3-5 minutes. The goal is to achieve a light and fluffy mixture that is pale in color. Creaming incorporates air into the batter, which contributes to the cake’s rise and texture.
Incorporating Eggs and Extracts: Ensuring a Well-Blended Mixture
Once your butter and sugar are creamed to perfection, add in three large eggs, one at a time, mixing well after each addition. This step is crucial for emulsifying the ingredients, which helps create a stable batter. Also, add 2 teaspoons of pure vanilla extract for that classic vanilla flavor. Ensure everything is well combined, scraping down the sides of the bowl as needed.
Combining Dry and Wet Ingredients: Tips for Avoiding Overmixing
Now, it’s time to combine the dry ingredients with the wet mixture. Begin by adding one-third of the dry mixture to the creamed butter and sugar, mixing on low speed until just incorporated. Alternate with adding half of a cup of whole milk, continuing to mix on low. Repeat this process until all ingredients are combined, making sure to end with the dry ingredients. Be careful not to overmix, as this can lead to a dense cake. Stop mixing as soon as there are no visible flour streaks.
Baking Process: Signs of Doneness and How to Check
Pour the batter evenly into the prepared cake pans, smoothing the tops. Place the pans in your preheated oven and bake for 25-30 minutes. To check for doneness, insert a toothpick into the center of the cakes. It should come out clean or with a few moist crumbs. If the toothpick is covered in wet batter, give the cakes a few more minutes in the oven. Avoid opening the oven door too soon, as this can cause the cakes to collapse.
Cooling the Cakes: Why It’s Crucial Before Frosting
Once the cakes are fully baked, remove them from the oven and let them cool in the pans for about 10-15 minutes. Afterward, carefully transfer them to a cooling rack to cool completely. Allowing the cakes to cool completely is crucial before frosting; otherwise, the frosting could melt and slide off, ruining your beautifully baked creation.
Frosting Options for Vanilla Cake
When it comes to frosting a classic vanilla cake, there are numerous delicious options to choose from. Here’s an overview of some popular frosting types that pair perfectly with vanilla cake.
Vanilla Buttercream: Classic Pairing with Vanilla Cake
Vanilla buttercream is the most popular choice for frosting a vanilla cake due to its sweet and rich flavor. To make it, beat 1 cup (226 grams) of softened unsalted butter until creamy, then gradually add 4 cups (480 grams) of powdered sugar, 2 teaspoons of vanilla extract, and a splash of milk to achieve the desired consistency. This frosting is perfect for spreading and piping.
Cream Cheese Frosting: Adding Tanginess
For a slightly tangy and creamy flavor, consider using cream cheese frosting. Combine 8 ounces (226 grams) of softened cream cheese, 1/2 cup (113 grams) of softened unsalted butter, and 4 cups (480 grams) of powdered sugar. Mix until smooth and creamy, adding a splash of vanilla extract. This frosting is particularly delightful if you want to balance the sweetness of the cake.
Whipped Cream Frosting: Light and Airy Alternative
For a lighter option, whipped cream frosting is an excellent choice. Simply beat 1 cup (240 ml) of heavy cream with 2 tablespoons of powdered sugar and 1 teaspoon of vanilla extract until soft peaks form. This fluffy frosting is perfect for a summer cake, adding a refreshing touch.
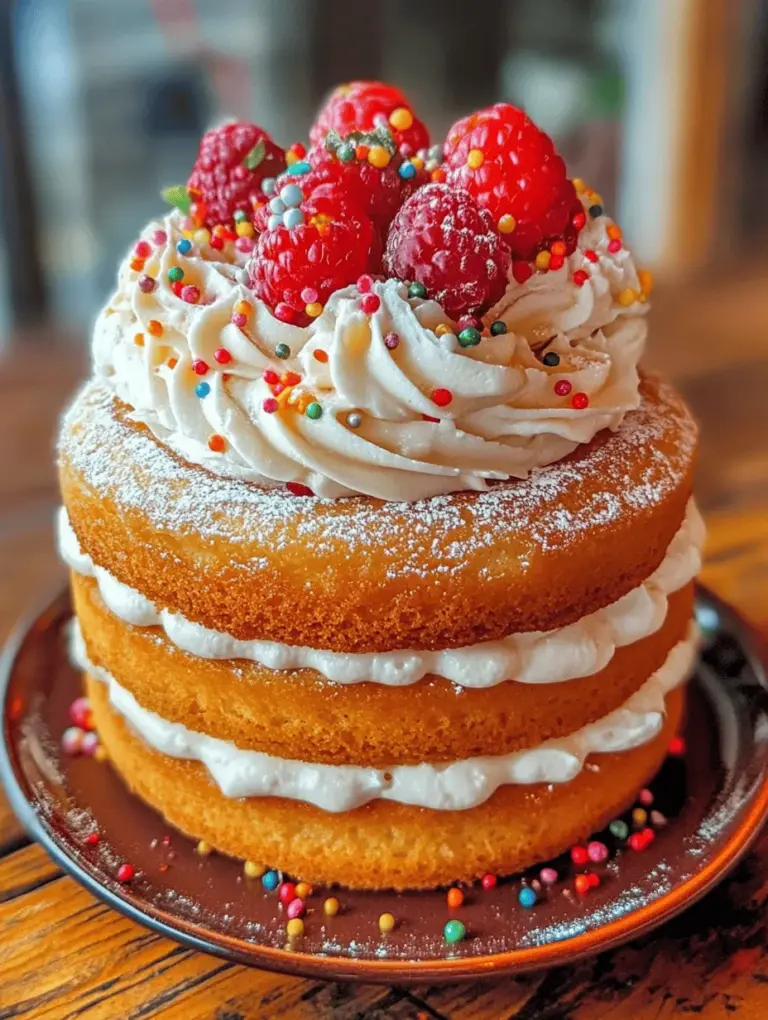
Tips for Decorating the Cake: Simple Yet Elegant Ideas
Once you’ve chosen your frosting, it’s time to decorate your cake. For a simple yet elegant look, spread a thick layer of frosting on top and let it cascade down the sides. You can also use a spatula or a cake scraper to create textured patterns. For added flair, consider garnishing with fresh fruit, chocolate shavings, or edible flowers. If you want a more elaborate design, piping techniques can create beautiful borders and floral decorations.
Serving Suggestions
Vanilla cake is a versatile dessert that can be enjoyed on various occasions. Here are some serving suggestions:
Best Occasions for Serving the Vanilla Cake
Classic vanilla cake is perfect for celebrations such as birthdays, weddings, and anniversaries. It also makes a delightful addition to holiday gatherings and family reunions. Its timeless appeal ensures it can be enjoyed by guests of all ages.
Pairing Ideas with Beverages
When serving vanilla cake, consider pairing it with beverages that complement its flavors. A cup of freshly brewed coffee or tea can elevate the experience, as their rich notes balance the cake’s sweetness. For a refreshing twist, serve slices of vanilla cake alongside lemonade or iced tea during warm weather.
Storing Leftovers: How to Keep the Cake Fresh
If you have leftovers, it’s essential to store your vanilla cake properly to keep it fresh. Place the cooled cake in an airtight container at room temperature for up to 3 days. For longer storage, wrap the cake tightly in plastic wrap and store it in the refrigerator, where it can last up to a week. If you’d like to keep it for an extended period, you can freeze the cake. Wrap it in plastic wrap and aluminum foil, and it can be stored in the freezer for up to 3 months. When ready to enjoy, thaw it in the refrigerator overnight.
Nutritional Information
Understanding the nutritional content of your classic vanilla cake can help you make informed choices. Here’s a breakdown of the approximate calories and nutritional content per serving (1 slice, based on 12 slices):
– Calories: 250
– Total Fat: 10g
– Saturated Fat: 6g
– Cholesterol: 60mg
– Sodium: 200mg
– Total Carbohydrates: 37g
– Dietary Fiber: 0g
– Sugars: 20g
– Protein: 3g
Discussion on Modifications for Dietary Needs
For those with dietary restrictions, there are modifications you can make to this classic recipe. To create a gluten-free vanilla cake, substitute all-purpose flour with a 1:1 gluten-free baking flour blend. For dairy-free options, use plant-based butter and almond milk in place of regular butter and whole milk. These adjustments will allow everyone to enjoy this delightful dessert without compromising taste.
Conclusion
In summary, the classic vanilla cake is a beloved dessert that stands the test of time. Its versatility, combined with the ease of preparation, makes it an ideal choice for various occasions. Whether you choose to frost it with buttercream, cream cheese, or whipped cream, the result is always a hit. We encourage you to try making this classic vanilla cake at home; the process of baking is a rewarding experience that allows you to share delicious treats with family and friends. Baking not only brings joy to your kitchen but also creates fond memories around the dining table. So, gather your ingredients, preheat your oven, and embark on this delightful baking adventure—you won’t regret it!