Introduction
Red velvet is a flavor that has captured the hearts of dessert lovers around the world. Known for its striking deep red color and subtle cocoa flavor, red velvet has become a staple in celebration cakes, especially during holidays like Valentine’s Day and Christmas. The rich, velvety texture combined with a hint of tanginess creates a unique taste profile that sets it apart from traditional chocolate or vanilla desserts. It evokes feelings of indulgence and has a nostalgic charm, making it the perfect choice for any celebration.
When it comes to serving desserts at gatherings or parties, mini cheesecakes offer an appealing option. These bite-sized treats are not only visually stunning but also incredibly convenient. They allow for easy serving and portion control, enabling guests to indulge without overindulging. Mini red velvet cheesecakes take this idea to a new level by beautifully combining the beloved flavor of red velvet with the creamy richness of cheesecake. The result? A delightful dessert that pleases the palate and adds a touch of elegance to any occasion.
In this article, we will delve into the allure of mini red velvet cheesecakes, exploring their popularity among dessert enthusiasts and the benefits of their miniature form. We will also provide a detailed breakdown of essential ingredients and guide you through the initial steps of crafting these delectable treats.
The Allure of Mini Red Velvet Cheesecakes
The popularity of red velvet desserts has soared in recent years, with this flavor appearing in everything from cakes and cupcakes to cookies and pancakes. The visual appeal of red velvet desserts, often adorned with cream cheese frosting, makes them a showstopper at any gathering. Furthermore, the flavor profile—an intriguing blend of cocoa and buttermilk—offers a delightful twist that resonates with many.
Cheesecakes, on the other hand, have long been a favorite among dessert lovers for their rich, creamy texture and versatility. They can be served plain or adorned with a wide variety of toppings, making them suitable for any taste preference. The combination of red velvet and cheesecake in mini cheesecakes creates a harmonious balance of flavors and textures. Each bite delivers the moistness of red velvet cake complemented by the smoothness of the cheesecake filling, making it a truly indulgent experience.
One of the key benefits of miniaturizing desserts is portion control. In today’s health-conscious world, many people prefer to enjoy a little taste of something sweet without committing to a large slice of cake. Mini red velvet cheesecakes can be enjoyed guilt-free, allowing guests to savor the flavor without feeling overly full. Additionally, their small size makes them easy to serve at parties, as they can be arranged beautifully on platters, adding an aesthetic appeal to your dessert table.
Understanding the Ingredients
To create the perfect mini red velvet cheesecakes, it’s essential to understand the role of each ingredient involved in the recipe.
Key Ingredients for the Crust
The crust serves as the foundation for these mini cheesecakes, providing texture and flavor. The primary ingredient for the crust typically consists of chocolate cookies, which contribute a rich, chocolatey flavor that complements the red velvet filling. The crushed cookies are mixed with melted butter to create a sandy texture that holds together when pressed into the cheesecake molds.
The Cheesecake Filling Ingredients
The cheesecake filling is where the magic happens. The primary ingredient here is cream cheese, which provides the rich, creamy base that is characteristic of cheesecakes. It’s crucial to use full-fat cream cheese for the best texture and flavor. To achieve the perfect consistency, the cream cheese must be softened to room temperature before mixing. This ensures a smooth and creamy filling without lumps.
Sour cream is another vital ingredient that contributes to the overall tanginess and creaminess of the cheesecake filling. It adds a depth of flavor that perfectly balances the sweetness of the other ingredients. Eggs are used to bind the filling together, providing structure and stability as the cheesecakes bake.
Vanilla extract adds an aromatic depth, enhancing the flavor profile of the cheesecake. Cocoa powder, while not dominant, provides a subtle chocolate undertone that complements the red velvet. The star of the show, red food coloring, is essential for giving the cheesecakes their signature hue. The intensity of the color can be adjusted based on preference, but it’s important to use high-quality gel food coloring for the best results.
Lastly, a splash of lemon juice may be added to brighten the flavors and enhance the overall taste of the filling.
Overview of the Cream Cheese Frosting Components
No mini red velvet cheesecake is complete without a luscious cream cheese frosting. This frosting typically includes more cream cheese, butter, and powdered sugar. The cream cheese offers that familiar tangy flavor, while butter provides richness and a smooth texture. Powdered sugar is essential for sweetness and helps achieve a creamy consistency that can be easily piped onto the tops of the cheesecakes.
Each component plays a crucial role in creating the perfect mini red velvet cheesecakes, offering a balance of textures and flavors that will leave your guests craving more.
Step-by-Step Recipe Guide
Preparation of the Crust
Now that we’ve explored the allure and essential ingredients of mini red velvet cheesecakes, it’s time to dive into the preparation.
1. Preheat the Oven: Start by preheating your oven to 350°F (175°C). This step is crucial to ensure that your cheesecakes bake evenly.
2. Prepare the Crust Mixture: In a medium-sized mixing bowl, combine crushed chocolate cookies with melted butter. Use a fork to mix until the crumbs are fully coated. The mixture should resemble wet sand and hold together when pressed.
3. Press the Crust Firmly: Line a muffin tin with paper liners or silicone molds. Using a spoon or your fingers, press the cookie mixture firmly into the bottom of each liner, creating a solid base for the cheesecake filling. This step is vital for structural integrity, ensuring that the crust holds up when you remove the cheesecakes from the molds.
Crafting the Cheesecake Filling
1. Soften the Cream Cheese: Before you begin mixing the filling, ensure that your cream cheese is softened to room temperature. This step is crucial for achieving a smooth and lump-free mixture. If you forget to take it out ahead of time, you can microwave it in short bursts, checking frequently until softened.
2. Mix the Ingredients: In a large mixing bowl, beat the softened cream cheese using an electric mixer until smooth and creamy. Gradually add the sour cream, mixing until well combined. Then, add the eggs one at a time, ensuring each is fully incorporated before adding the next.
3. Incorporate the Flavorings: Add the vanilla extract, cocoa powder, red food coloring, and lemon juice to the mixture. Mix until everything is well blended, and the filling is smooth and creamy.
4. Fill the Crusts: Carefully spoon the cheesecake filling over the prepared crusts in the muffin tin. Fill each liner to the top, as the cheesecakes will not rise significantly during baking.
Following these steps will set you on the right path to creating delicious mini red velvet cheesecakes that are sure to impress your guests. Stay tuned for further instructions and tips to ensure your cheesecakes turn out perfectly!
Step-by-Step Mixing Instructions to Achieve the Desired Consistency
To make the perfect mini red velvet cheesecakes, start by preparing your cream cheese filling. Begin by placing the softened cream cheese in a large mixing bowl. Using an electric mixer, beat the cream cheese on medium speed until it’s smooth and creamy, about 1-2 minutes. This step is crucial for avoiding lumps in your cheesecake filling. Next, add in the granulated sugar and continue to mix until well combined, ensuring there are no gritty textures left.
Now, it’s time to incorporate the eggs. Add them one at a time, mixing on low speed after each addition until just combined. Overmixing at this stage can lead to a dense cheesecake, so be gentle. Once the eggs are fully incorporated, add the vanilla extract and buttermilk. These ingredients add flavor and moisture to your cheesecakes. Mix until the batter is smooth and well blended, but avoid overmixing. The final batter should be creamy and slightly pourable, resembling a thick pancake batter.
Assembling the Mini Cheesecakes
With your red velvet cheesecake filling ready, it’s time to assemble the mini cheesecakes. Begin by preheating your oven to 325°F (160°C). Line a muffin tin with paper liners or silicone molds, which will help in easy removal post-baking. If you’re using a muffin tin, consider placing a small cookie or graham cracker crust in the bottom of each liner. This will add an extra layer of flavor and texture.
Pour the prepared cheesecake filling into each lined muffin cup, filling them about three-quarters full. This allows room for the cheesecakes to rise slightly without spilling over. Be sure to tap the muffin tin gently on the counter to release any air bubbles trapped in the batter. This step is essential for achieving a smooth surface on your mini cheesecakes.
Guidelines for Pouring and Baking the Cheesecake Filling
Once your batter is evenly distributed among the muffin cups, it’s time to bake. Place the muffin tin in the preheated oven and bake for approximately 18-22 minutes. The cheesecakes are done when the edges are set but the center still has a slight jiggle. It’s important not to overbake them, as this can result in a dry texture.
To ensure even baking, consider using a water bath. To do this, place a larger baking dish filled with hot water on the rack below your cheesecakes. This will create a moist environment in the oven and help prevent cracking.
Importance of Monitoring Baking Time for Optimal Texture
The baking time can vary depending on your oven and the size of your muffin tin, so keep a close eye on them as they approach the 18-minute mark. Once removed from the oven, allow the mini cheesecakes to cool in the pan for about 10 minutes. Then, transfer them to a wire rack to cool completely. This cooling process is vital for developing the right texture and preventing cracks.
Making the Cream Cheese Frosting
While your mini cheesecakes are cooling, you can prepare the cream cheese frosting. In a separate mixing bowl, beat together softened cream cheese and unsalted butter until smooth. This usually takes about 2 minutes on medium speed. Gradually add powdered sugar, mixing until well incorporated. The amount of sugar can be adjusted based on your sweetness preference.
Next, add a splash of vanilla extract and a couple of tablespoons of heavy cream. The heavy cream helps achieve a light, fluffy texture in the frosting. Mix on low speed until combined, then increase to medium speed and beat for an additional 2-3 minutes until the frosting is light and airy. The final consistency should be thick enough to hold its shape yet soft enough to spread easily.
Detailed Instructions for Achieving the Right Frosting Consistency
When making the frosting, it’s crucial to ensure that your cream cheese and butter are at room temperature. Cold ingredients can lead to a lumpy frosting. If your frosting is too thick, add a little more heavy cream, a tablespoon at a time, until you reach the desired consistency. Conversely, if it’s too thin, add a little more powdered sugar to thicken it up.
Tips for Flavor Balancing with Vanilla and Heavy Cream
For optimal flavor, use pure vanilla extract rather than imitation vanilla. The quality of your ingredients directly affects the final taste of your frosting. Additionally, don’t hesitate to experiment by adding a dash of cocoa powder for a chocolate twist or even a hint of almond extract for a unique flavor profile.
Frosting and Garnishing
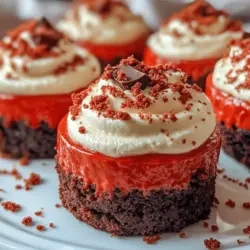
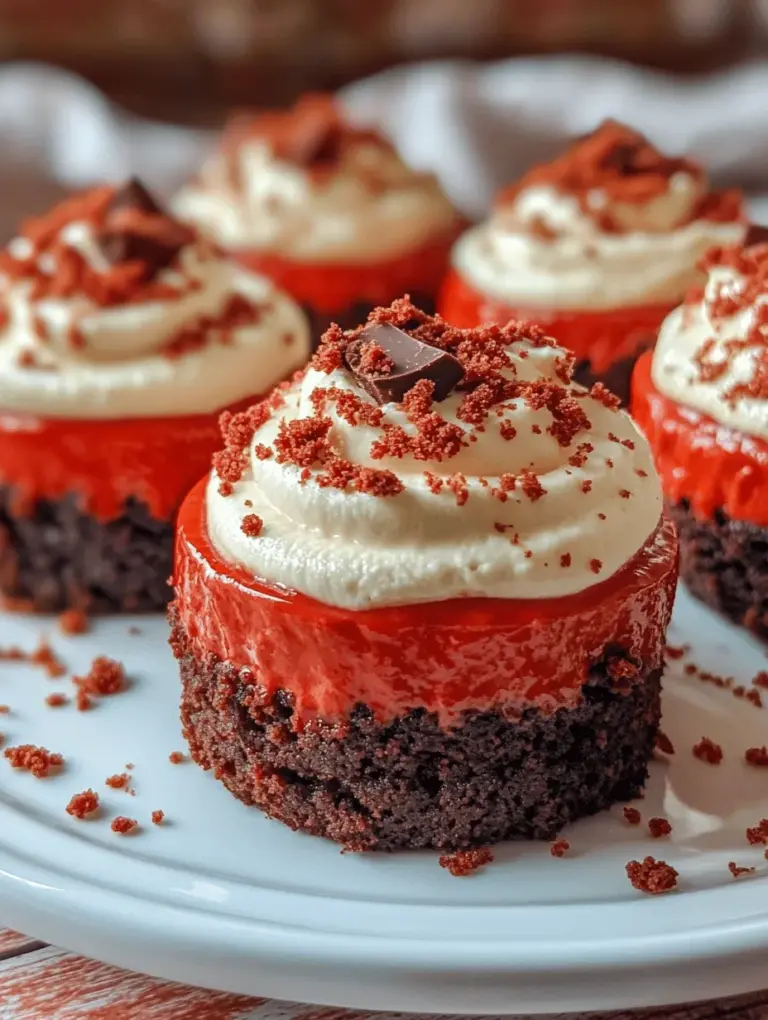
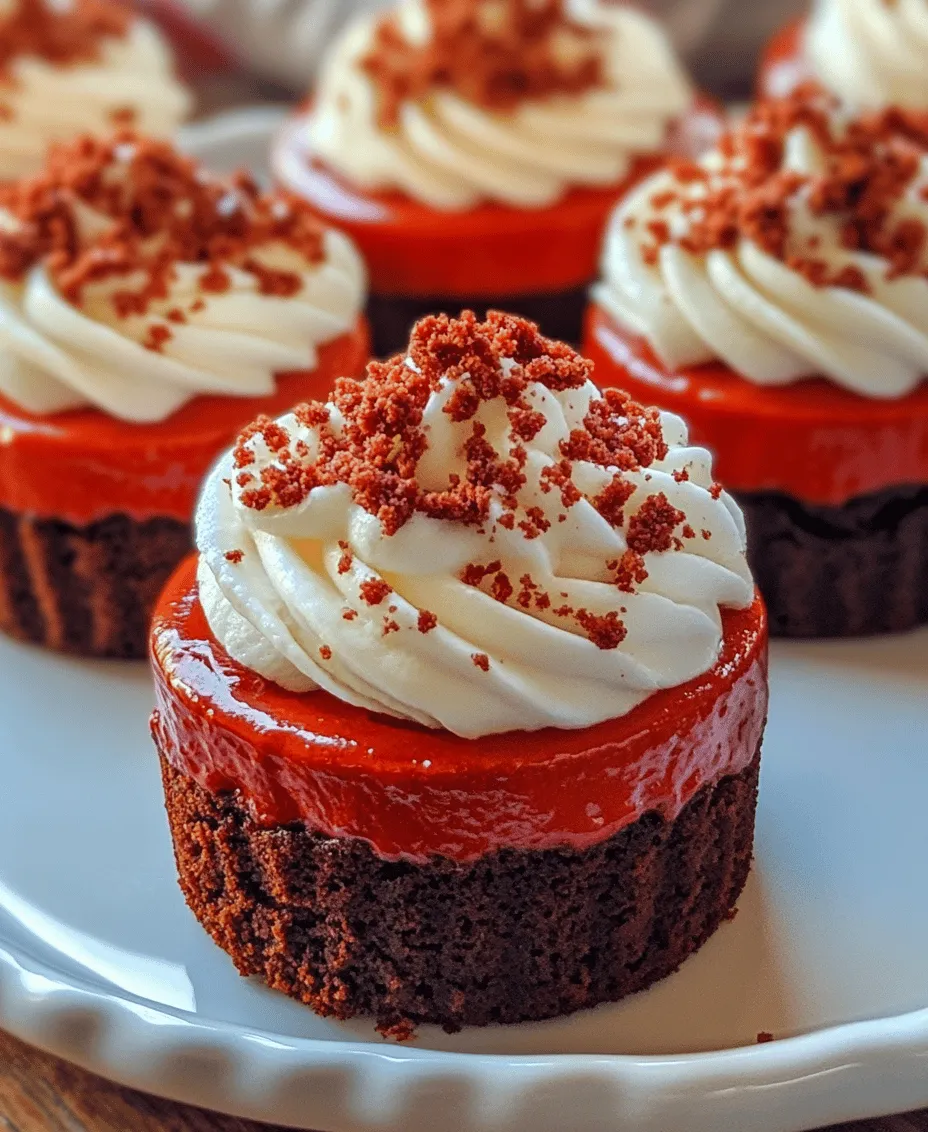
Now it’s time to frost your mini red velvet cheesecakes. Using a piping bag fitted with a star tip, pipe the frosting onto the cooled cheesecakes for an elegant presentation. If you don’t have a piping bag, a simple offset spatula can also work well for spreading the frosting on top.
For garnishing, consider adding some grated chocolate or red velvet cake crumbs on top of the frosting. This not only enhances the visual appeal but also adds an extra layer of texture. Fresh raspberries or a drizzle of chocolate sauce can also make for delightful toppings.
Baking Tips for Success
To ensure success with your mini red velvet cheesecakes, keep the following tips in mind:
– Use Room Temperature Ingredients: Ensure that your cream cheese and eggs are at room temperature before mixing. This helps achieve a smoother batter.
– Don’t Skip the Cooling Process: Allow the cheesecakes to cool gradually to prevent cracking.
– Refrigeration is Key: After the cheesecakes have cooled to room temperature, refrigerate them for at least 4 hours or overnight. This chilling time is essential for the cheesecake to set properly and for flavors to develop.
Common Pitfalls to Avoid in the Baking and Cooling Process
The most common pitfall is overmixing the batter, which can lead to a dense cheesecake. Another mistake is not monitoring the baking time closely. If you bake them too long, they can dry out. Lastly, remember that the cheesecakes continue to cook slightly after being removed from the oven due to residual heat, so it’s okay to take them out when they still have a slight jiggle in the center.
Nutritional Information
Each mini red velvet cheesecake typically contains approximately 250 calories, 18g of fat, and 20g of carbohydrates. They are a delightful indulgence, but there are ways to lighten them up. For instance, you can substitute low-fat cream cheese for regular cream cheese, and use Greek yogurt instead of heavy cream in the frosting.
Overview of Serving Size and Nutritional Benefits
These mini cheesecakes are perfect for portion control, allowing you to enjoy a sweet treat without overindulging. They offer a rich source of calcium from the cream cheese and can be made with alternative sweeteners for a lower sugar option.
Discussion on Options for Healthier Ingredient Substitutions
For a healthier twist on this recipe, consider using almond flour for the crust instead of traditional graham crackers. Additionally, using unsweetened cocoa powder can enhance the flavor without adding unnecessary sugar.
Serving Suggestions
Pair your mini red velvet cheesecakes with a variety of beverages for an exquisite dessert experience. A cup of freshly brewed coffee complements the richness of the cheesecake beautifully, while a glass of dessert wine can elevate the flavors even further.
For a festive touch at gatherings, consider arranging the cheesecakes on a decorative platter with fresh berries or edible flowers for a pop of color. This presentation not only looks appealing but also invites guests to indulge in a delightful treat.
Presentation Tips for Serving at Events and Gatherings
When serving these mini cheesecakes at events, consider placing them in individual dessert cups or on small dessert plates. This not only enhances the visual appeal but also makes it easier for guests to enjoy them without the hassle of slicing a larger cake.
Conclusion
Making mini red velvet cheesecakes is not just about creating a dessert; it’s about embracing the joy of baking and sharing delicious treats with loved ones. These indulgent delights are perfect for any occasion, whether it’s a festive celebration or a cozy get-together with friends.
Don’t hesitate to explore the versatility of mini cheesecakes, experimenting with flavors and presentations. As you perfect your technique, you’ll find that these little bites of joy become a cherished part of your dessert repertoire. So gather your ingredients, don your apron, and delight in the process of creating these marvelous mini red velvet cheesecakes.