Introduction
The allure of no-bake desserts is undeniable. In a world where time is often limited, the convenience of whipping up a delicious treat without the need for an oven is a game changer for home cooks. Among the myriad of no-bake options, the Oreo cheesecake stands out as a decadent delight that satisfies sweet cravings with minimal effort. Combining the rich, creamy texture of cheesecake with the beloved flavor of Oreo cookies, this dessert has gained immense popularity among dessert enthusiasts.
The beauty of this recipe lies in its simplicity and quick preparation. With just a handful of ingredients and no baking required, you can create individual Oreo cheesecake cups that are perfect for any occasion. Whether you’re hosting a dinner party, celebrating a birthday, or simply indulging in a sweet treat after a long day, these cheesecake cups are sure to impress. In this article, we will guide you through the process of crafting these delectable Oreo cheesecake cups at home, ensuring that your dessert game is always on point.
Understanding No-Bake Cheesecake
Before diving into the recipe, it’s essential to understand what a no-bake cheesecake is and why it has become a favorite among dessert lovers. No-bake cheesecake is a dessert that derives its creamy texture from a combination of cream cheese, whipped cream, and sugar, without the need for baking. Unlike traditional cheesecakes, which rely on the heat of the oven to set and develop their flavors, no-bake cheesecakes utilize the natural properties of the ingredients to achieve a rich consistency.
The appeal of no-bake cheesecakes lies in their ease of preparation. They require minimal cooking skills and equipment, making them accessible to novice bakers and busy individuals alike. There’s no need to fuss over water baths or monitor oven temperatures; instead, you simply mix the ingredients, assemble the dessert, and let it chill in the refrigerator. This time-saving aspect, combined with the indulgent taste, makes no-bake cheesecakes a go-to option for many home cooks.
Furthermore, no-bake recipes tend to be more forgiving than their baked counterparts. This flexibility allows for creativity in the kitchen, encouraging cooks to experiment with flavors and textures. If you’re looking for a quick dessert that doesn’t compromise on taste, no-bake cheesecake is undoubtedly the way to go.
Ingredients Breakdown
Now that we’ve established the allure of no-bake cheesecakes, let’s delve into the key ingredients that make these Decadent No-Bake Oreo Cheesecake Cups so irresistible.
Oreo Cookies
At the heart of this recipe are Oreo cookies, a beloved treat that has captured the hearts of many since its introduction in 1912. These chocolate sandwich cookies, filled with a sweet crème, are not only delightful on their own but also serve as an excellent base for desserts. Their crunchy texture and rich flavor make them a perfect pairing for creamy cheesecake.
The versatility of Oreos is unmatched; they can be used in a variety of desserts, from milkshakes to cheesecakes to pie crusts. Their distinct flavor profile adds a layer of indulgence to any recipe, and in this case, they provide a delicious contrast to the smoothness of the cheesecake filling.
Cream Cheese
Cream cheese is the star ingredient in any cheesecake recipe, providing the rich and creamy texture that defines this dessert. For our no-bake Oreo cheesecake cups, the quality of cream cheese used can significantly impact the final outcome. There are various types of cream cheese available, including regular, low-fat, and whipped varieties.
Regular cream cheese offers a dense and rich texture, ideal for cheesecakes, while low-fat cream cheese can result in a lighter dessert but may lack some of the creaminess. Whipped cream cheese, on the other hand, is lighter and fluffier, which can lead to a different mouthfeel. For the best results, it’s recommended to use full-fat cream cheese, as it provides the optimal balance of flavor and texture.
Heavy Whipping Cream
To achieve that luxurious fluffiness in our cheesecake cups, heavy whipping cream plays a crucial role. When whipped to soft peaks, it adds lightness and volume to the cheesecake filling, creating a delightful contrast to the density of the cream cheese. The fat content in heavy cream is essential for achieving the right texture; it ensures that the cheesecake cups remain stable and sliceable once set.
Optional Ingredients: Cocoa Powder and Mint Leaves
While the basic recipe is delicious on its own, you can elevate your Oreo cheesecake cups with optional ingredients like cocoa powder for added richness or mint leaves for a refreshing touch. Dusting the tops with cocoa powder can enhance the chocolate flavor, while mint leaves can provide a pop of color and a hint of freshness.
Garnishing
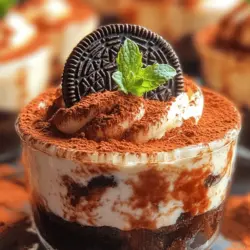
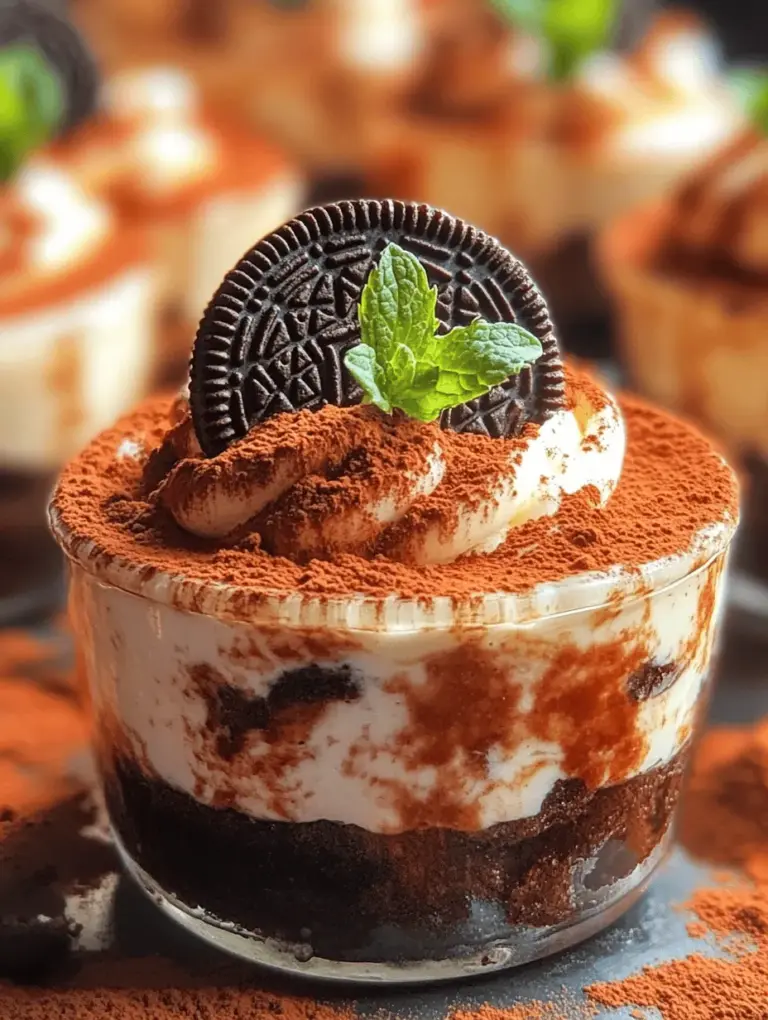
Don’t underestimate the power of garnishing! Adding a simple touch on top of your Oreo cheesecake cups not only enhances the visual appeal but can also elevate the flavor profile. Whether it’s a sprinkle of crushed Oreo cookies, a dollop of whipped cream, or a drizzle of chocolate sauce, garnishing can take your dessert from ordinary to extraordinary.
Step-by-Step Preparation Guide
Now that we have a clear understanding of the ingredients, let’s move on to the preparation of our Decadent No-Bake Oreo Cheesecake Cups. The process is straightforward, allowing you to enjoy the making of this delightful dessert.
Preparing the Oreo Base
The first step in crafting these cheesecake cups is to prepare the Oreo base. This layer will provide a crunchy foundation that complements the creamy filling beautifully.
1. Crushing the Oreos: Start by placing about 18 Oreo cookies in a food processor. Pulse them until you achieve a fine crumb consistency. If you don’t have a food processor, you can place the cookies in a zip-top bag and crush them with a rolling pin. The aim is to create crumbs that are fine enough to hold together when mixed with butter.
2. Mixing with Butter: Once your Oreos are crushed, transfer them to a mixing bowl. Melt approximately 4 tablespoons of unsalted butter and pour it over the cookie crumbs. Use a spatula or your hands to mix the butter into the crumbs until they are well combined and resemble wet sand. This mixture will serve as the base for your cheesecake cups, providing stability and flavor.
Assembling the Base
With your Oreo base prepared, it’s time to assemble it into your serving cups.
1. Distributing the Mixture: Take your mixture of crushed Oreos and melted butter and start distributing it evenly into your serving cups. You can use small dessert cups or even mason jars for an aesthetically pleasing presentation. Aim for about 2-3 tablespoons of the mixture per cup, depending on the size you’re using.
2. Pressing the Mixture: After adding the crumb mixture to each cup, use the back of a spoon or your fingers to firmly press the crumbs down. This step is crucial as it creates a stable base that will hold the cheesecake filling. Ensure that the base is compact and level, as this will prevent it from crumbling when you serve the cups.
By following these initial steps, you are well on your way to creating delicious Decadent No-Bake Oreo Cheesecake Cups. The combination of the rich Oreo base and the creamy filling will soon come together to form a dessert that is not only visually appealing but also incredibly tasty. Stay tuned as we continue to explore the rest of this delightful recipe!

Crafting the Cheesecake Filling
Creating the perfect cheesecake filling is crucial for achieving that rich, creamy texture that complements the Oreo crust beautifully. Start by ensuring that your cream cheese is at room temperature to facilitate easy blending. This step cannot be overstated, as cold cream cheese can lead to lumps in your filling.
Tips for Softening and Beating Cream Cheese Effectively
To soften cream cheese quickly, you can cut it into small cubes and let it sit at room temperature for about 15 to 20 minutes. If you’re short on time, you can microwave it for about 10-15 seconds, just enough to take the chill off, but be careful not to melt it. Once softened, place the cream cheese in a mixing bowl and beat it on medium speed until it is smooth and creamy—about 2 minutes should suffice.
Importance of Adding Powdered Sugar Gradually to Avoid Clumps
Once your cream cheese is smooth, it’s time to incorporate the powdered sugar. Add it gradually, about half a cup at a time. This method helps prevent clumps and ensures that the sugar is fully integrated into the cream cheese mixture. Mixing on a low speed initially will also help avoid a cloud of powdered sugar from enveloping your kitchen.
Whipping the Cream
Next, you’ll need to prepare the whipped cream, which adds a light and airy element to your cheesecake filling. Use heavy whipping cream, as it contains a higher fat content, which is ideal for achieving stiff peaks.
Techniques for Achieving Stiff Peaks and Maintaining Airiness
Start with a chilled mixing bowl and beaters, as this will help the cream whip up faster and hold its structure better. Pour the heavy cream into the bowl and whip it on medium-high speed. Keep an eye on the consistency; as you approach soft peaks, you can add a teaspoon of vanilla extract for flavor. Continue whipping until you achieve stiff peaks, which means that when you lift the beaters, the peaks stand straight up without collapsing.
Explanation of the Folding Method to Combine Mixtures
Once your whipped cream reaches the desired consistency, it’s time to combine it with the cream cheese mixture. Use a spatula for this step and employ the folding method. Start by taking a scoop of the whipped cream and gently folding it into the cream cheese mixture. This technique allows you to maintain the airiness of the whipped cream while ensuring an even blend. Repeat this process until all the whipped cream is incorporated, being careful not to deflate the mixture.
Layering the Cheesecake Filling
With your cheesecake filling ready, it’s time to layer it into your prepared cups. The presentation is key with no-bake cheesecake cups, as they are visually appealing and can be easily customized.
Suggestions for How to Fill Cups for an Appealing Look
Using a piping bag can help you achieve a neat and professional look when filling the cups. Simply transfer the cheesecake filling into the piping bag and pipe it into the cups, creating layers of filling that contrast beautifully with the Oreo crust. You can alternate between layers of crust and cheesecake filling for a stunning visual effect.
Importance of Not Overfilling
While it may be tempting to fill your cups to the brim, avoid overfilling them, as this can lead to messy presentations and may cause the filling to spill over the sides. Leave a little space at the top for additional toppings and to allow the cheesecake to set properly in the refrigerator.
Adding Toppings
Toppings are where you can really get creative. While crushed Oreos are a classic choice, there are many ways to elevate your dessert’s appearance and flavor.
Creative Ideas for Additional Toppings Beyond Oreos
Consider adding a drizzle of chocolate or caramel sauce for a touch of indulgence. Fresh berries, such as strawberries or raspberries, provide a refreshing contrast to the rich cheesecake. You could even sprinkle mini chocolate chips or additional crushed cookies on top for added texture. For a more sophisticated twist, consider using a dollop of whipped cream or a sprinkle of cocoa powder.
Importance of Visuals in Dessert Presentation
Remember, we eat with our eyes first, so take the time to arrange your toppings thoughtfully. A well-presented dessert can elevate the entire dining experience, making it more enticing for your guests.
Chilling the Cheesecake Cups
After adding your desired toppings, it’s crucial to chill your cheesecake cups to allow them to set properly. The chilling process firms up the filling, making it easier to serve and enhancing the flavors.
Explanation of the Chilling Process and Its Significance
Chilling allows the cheesecake filling to stabilize, ensuring that it holds its shape when served. This step is essential for achieving that perfect slice or scoop. If you skip this part, you might end up with a runny filling that doesn’t hold together.
Recommendations for Optimal Chilling Time
For the best results, chill your cheesecake cups in the refrigerator for at least 4 hours, or preferably overnight. This extended chilling time allows the flavors to meld and develop, resulting in a richer, more decadent cheesecake.
Serving Suggestions
Now that your Decadent No-Bake Oreo Cheesecake Cups are ready, it’s time to serve them up!
Ideal Occasions for Serving Oreo Cheesecake Cups
These delightful dessert cups are perfect for a variety of occasions. Whether you’re hosting a birthday party, celebrating a holiday, or simply enjoying a casual get-together with friends and family, they are sure to impress.
Pairing Suggestions (Beverages or Complementary Desserts)
For beverages, consider pairing your cheesecake cups with a rich coffee or a sweet dessert wine to complement the chocolatey flavors. If you want to serve multiple desserts, consider offering a light fruit salad or a refreshing sorbet as a palate cleanser between bites.
Creative Serving Ideas (Using Different Glassware or Presentation Styles)
Experiment with different glassware to create unique presentations. Mason jars, shot glasses, or even elegant cocktail glasses can add a fun twist to your dessert. You could also consider layering the ingredients in a trifle dish for a stunning centerpiece.
Nutritional Information
Understanding the nutritional aspects of your desserts can help you indulge mindfully.
Overview of the Nutritional Aspects of the Recipe
Each serving of Decadent No-Bake Oreo Cheesecake Cups typically contains a combination of carbohydrates, fats, and proteins. The base of Oreos provides a deliciously sweet crust, while the cream cheese contributes to the rich and creamy filling.
Discussion on Portion Sizes and Indulgence Strategies
While these cheesecake cups are undeniably indulgent, portion control is key. You can opt for smaller serving sizes to enjoy the flavors without overindulging. Sharing with friends and family is another great way to savor these treats without feeling guilty.
Potential Modifications for Dietary Restrictions
If you or your guests have dietary restrictions, there are simple modifications you can make. For a gluten-free version, swap regular Oreos for gluten-free Oreos. If you’re looking for a dairy-free option, consider using vegan cream cheese and coconut whipped cream to maintain the rich flavor without dairy.
Conclusion
In conclusion, making Decadent No-Bake Oreo Cheesecake Cups is a straightforward and rewarding process. The simplicity of the recipe combined with its rich, indulgent flavor makes it a standout dessert for any occasion. Don’t hesitate to experiment with various toppings and presentations to make this dessert uniquely yours.
Creating desserts that bring people together is a joy, and with this cheesecake recipe, you’ll not only impress your guests but also provide them with a delightful experience they will remember. So gather your ingredients, get creative, and enjoy the process of crafting this delicious treat!