
Introduction
Chocolate mousse is often regarded as one of the most luxurious desserts, celebrated for its rich, velvety texture and intense chocolate flavor. Originating from France, this classic dessert has been a favorite for generations, captivating the hearts and palates of dessert lovers around the world. The allure of chocolate mousse lies not only in its exquisite taste but also in its versatility; it can be served in various forms, from elegant plated desserts in fine dining restaurants to simple, home-based indulgences.
Making chocolate mousse cups at home elevates this already decadent treat, allowing you to present it in a visually stunning manner while also tailoring it to your taste preferences. The individual servings make it perfect for dinner parties, special occasions, or simply as a treat to satisfy your sweet tooth. Each cup is an invitation to indulge, offering a delightful balance of rich chocolate and airy texture that melts in your mouth.
In this article, we will explore how to create these decadent chocolate mousse cups step-by-step. You’ll soon discover that with just a few high-quality ingredients and some simple techniques, you can whip up a dessert that rivals any restaurant offering.
Understanding the Ingredients
The key to a successful chocolate mousse lies in the quality of its ingredients. Each component contributes not only to the flavor but also to the overall texture and experience of the dessert. Let’s take a closer look at what you’ll need:
Dark Chocolate
Dark chocolate is the star of the show in any chocolate mousse recipe. For the best flavor, it’s essential to choose a chocolate with a high cocoa percentage—ideally, between 60% and 70%. This range strikes the perfect balance between sweetness and rich cocoa flavor, ensuring a decadent result without being overly sweet. Higher cocoa content also means more antioxidants and deeper flavors, enhancing the overall experience. When selecting dark chocolate, opt for brands known for their quality, as this will directly impact the taste of your mousse.
Eggs
Eggs play a crucial role in achieving the desired texture and richness of chocolate mousse. They are typically used in two forms: egg yolks and egg whites. The yolks add creaminess and richness, while the whites, when whipped, introduce lightness and airiness to the mousse. This combination is what gives chocolate mousse its signature delicate yet indulgent mouthfeel. Fresh, high-quality eggs are preferred, as they contribute to the overall flavor and texture of the dessert.
Sugar
Sugar is essential for balancing the flavors in chocolate mousse. It enhances the sweetness of the chocolate while also contributing to the overall richness of the dish. The amount of sugar you use can be adjusted based on your personal taste and the bitterness of the chocolate selected. It’s important to incorporate the sugar properly, ensuring it dissolves completely for a smooth and cohesive mousse.
Heavy Cream
Heavy cream is what gives chocolate mousse its luxurious, velvety texture. When whipped, it adds volume and lightness, transforming the mixture from dense to airy. The fat content in heavy cream is crucial for achieving that rich mouthfeel that mousse is known for. For best results, use fresh, high-quality heavy cream, as it will whip better and contribute to a more stable texture.
Fresh Berries and Garnishes
While the chocolate mousse itself is a showstopper, adding fresh berries and garnishes not only enhances the visual appeal of your dessert but also adds a refreshing contrast to the rich chocolate. Berries such as raspberries, strawberries, or blueberries complement the mousse beautifully, bringing a hint of tartness that balances the sweetness. Additionally, garnishes like mint leaves, shaved chocolate, or a sprinkle of sea salt can elevate the presentation, making your mousse cups even more enticing.
Preparation Process for Chocolate Mousse Cups
Creating decadent chocolate mousse cups might seem daunting, but with a clear step-by-step approach, you’ll find that it’s quite manageable. Here’s how to prepare this indulgent dessert:
Step 1: Melt the Chocolate
The first step in preparing chocolate mousse is to melt the dark chocolate. This can be done using a double boiler or a microwave. If you opt for a double boiler, fill a pot with about an inch of water and bring it to a simmer. Place a heatproof bowl on top of the pot, ensuring it doesn’t touch the water, and add the chopped dark chocolate. Stir gently until the chocolate is completely melted and smooth.
If you choose the microwave method, place the chopped chocolate in a microwave-safe bowl and heat it in short bursts, about 20 seconds at a time, stirring in between until fully melted. Be cautious not to overheat the chocolate, as it can seize up and become unusable.
Step 2: Whisk Egg Yolks
In a separate bowl, whisk the egg yolks until they are pale and slightly thickened. This process incorporates air and helps achieve a creamy texture. Once the yolks are whisked, gradually add the melted chocolate to the yolks, mixing until well combined. This step is crucial, as it ensures that the chocolate is tempered and won’t cook the eggs.
Step 3: Combine Ingredients
Next, it’s time to combine the sugar with the chocolate and egg yolk mixture. Add the sugar gradually, whisking continuously until it is fully incorporated. This will help dissolve the sugar, contributing to a smooth mousse base.
Step 4: Beat Egg Whites
In a clean, dry bowl, beat the egg whites until soft peaks form. This means that when you lift the whisk, the peaks should bend over gently. The incorporation of air into the egg whites is what will give the mousse its light and fluffy texture. Be sure to use a clean whisk and bowl, as any fat or residue can prevent the egg whites from whipping properly.
Step 5: Fold Techniques
Once the egg whites have reached the soft peak stage, it’s time to gently fold them into the chocolate mixture. This is a delicate process; using a spatula, carefully lift the chocolate mixture from the bottom of the bowl and fold it over the egg whites. The goal is to maintain the airiness of the egg whites while ensuring that everything is well combined. Repeat this process until no white streaks remain.
Folding is a technique that requires a gentle touch, so take your time here. The beauty of chocolate mousse lies in its light texture, so being too aggressive will result in a denser mousse.
By following these preparation steps, you will have a luxurious chocolate mousse ready for presentation in individual cups. Each layer of this dessert not only builds upon the rich flavors of chocolate but also creates a unique experience for those who indulge in it. In the next part of this article, we will dive into the final steps of assembling and serving your decadent chocolate mousse cups, along with tips for making them even more special. Stay tuned for the continuation of this delightful recipe!
Whip Cream: Achieving the Right Consistency for Incorporation
Whipping cream is a fundamental step in creating the light and airy texture that defines decadent chocolate mousse cups. Start by using heavy whipping cream, which contains at least 36% fat, ensuring the best volume and stability. Chill your mixing bowl and beaters in the refrigerator for about 10-15 minutes before you start. This helps the cream whip faster and increases the volume.
Begin whipping the cream on medium speed until soft peaks form. This means that when you lift the beaters out of the cream, a peak will form and gently bend over. Be cautious not to over-whip; if the cream becomes grainy or starts to look curdled, it has been whipped too long. Soft peaks are ideal for folding into the chocolate mixture, as they keep the mousse light and airy.
Once your cream reaches the soft peak stage, it’s time to fold it into your cooled chocolate mixture. Use a rubber spatula and gently fold the cream into the chocolate using a figure-eight motion. This technique helps maintain the airiness of the whipped cream, which is essential for the mousse to have the right texture. Be sure to incorporate the whipped cream thoroughly but gently to avoid deflating it.
Chill the Mousse: The Science Behind Setting the Mousse Properly
After combining the chocolate and whipped cream, the mousse must be chilled to set properly. Transfer the mixture into individual serving cups or a large bowl. Cover them with plastic wrap to prevent any moisture from forming on the surface. Place the mousse cups in the refrigerator for at least 2 to 4 hours, or until fully set.
The chilling process is crucial because it allows the chocolate to firm up, creating a rich and creamy texture. As the mousse cools, the fat from the chocolate and cream solidifies, providing stability and structure. It’s important to resist the temptation to rush this step, as the mousse will not fully develop its intended texture if it’s not chilled properly.
Presentation Ideas for Chocolate Mousse Cups
Presentation plays a key role in elevating your dessert experience. Here are some suggestions to make your chocolate mousse cups visually stunning and appetizing.
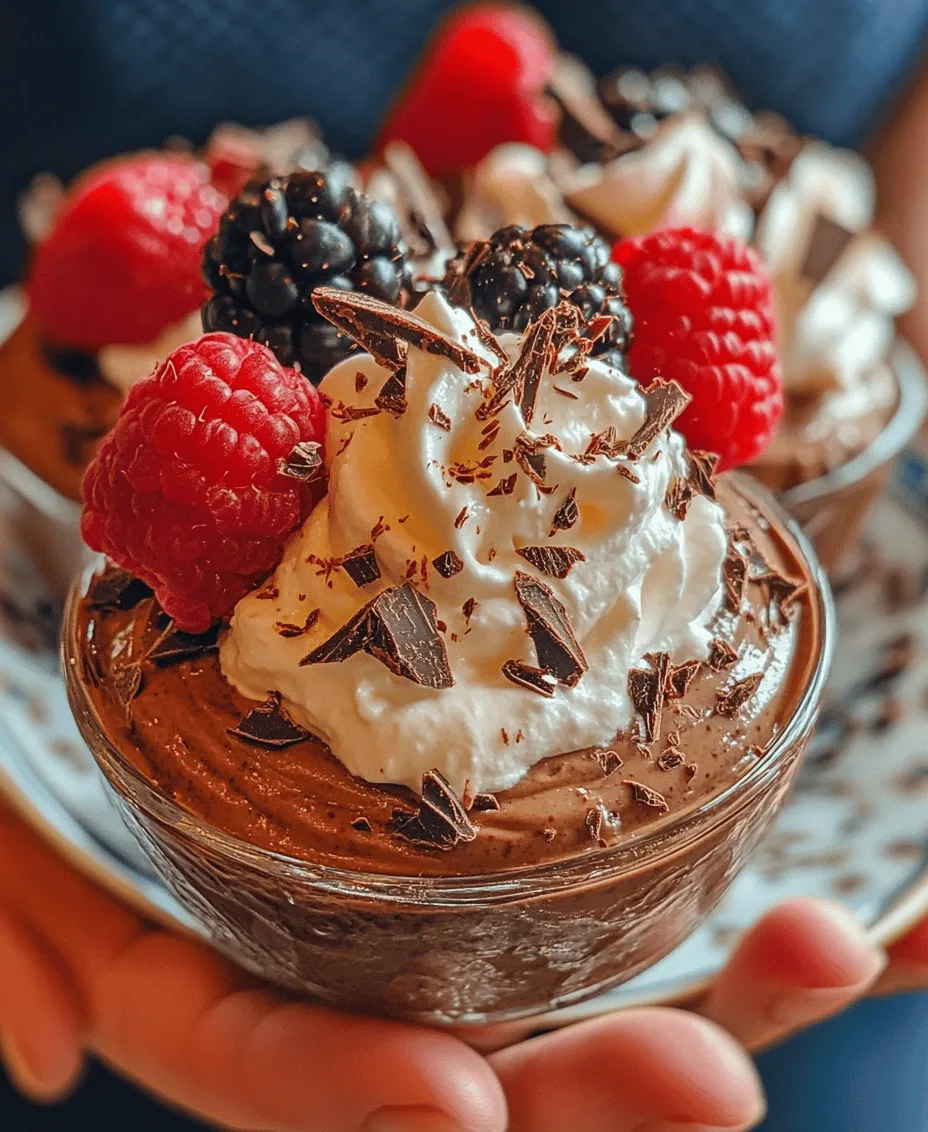
Choosing the Right Glassware or Cups
Selecting the right glassware can enhance the presentation of your chocolate mousse cups. Opt for clear glass dessert cups or elegant stemmed glasses that showcase the rich chocolate color and creamy texture of the mousse. You may also consider using small mason jars for a rustic feel or shot glasses for a fun, bite-sized treat. The choice of serving vessel can change the entire vibe of your dessert, making it feel more gourmet or casual based on the occasion.
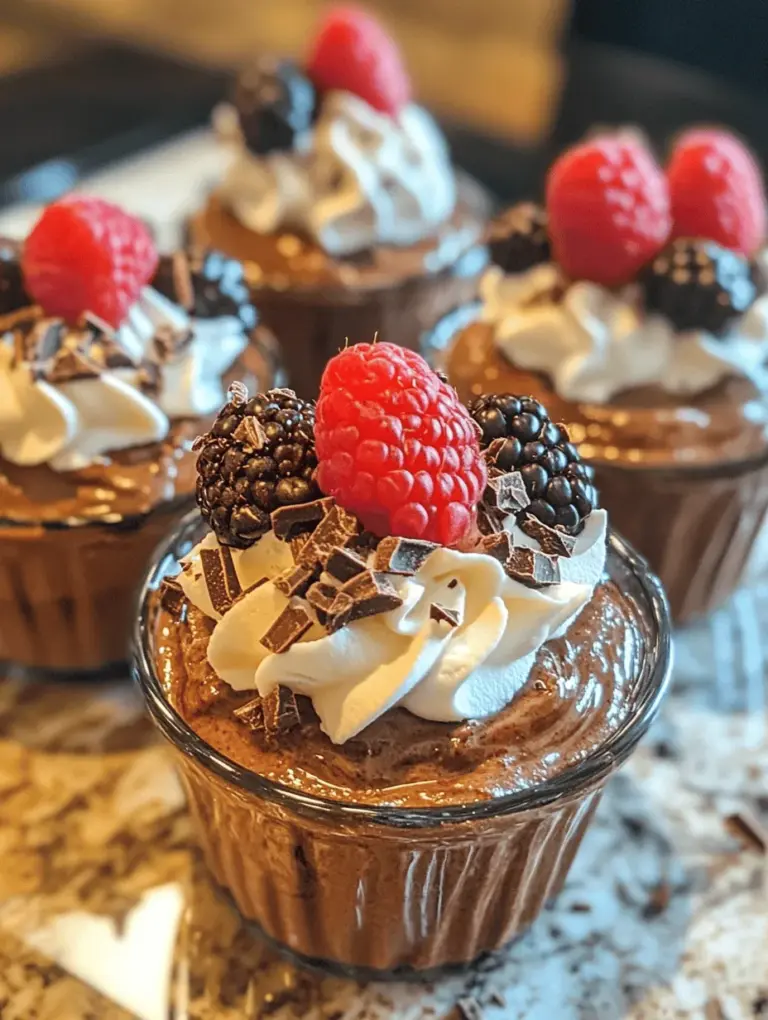
Creative Garnishing Ideas
1. Fresh Berries: Elevate your mousse cups with seasonal fresh berries. Raspberries, strawberries, or blueberries not only add a pop of color but also provide a delightful tartness that contrasts beautifully with the rich chocolate. Consider making a berry coulis to drizzle over the mousse for added flair.
2. Whipped Cream: Offer a twist on traditional whipped cream by infusing it with flavors. Consider adding vanilla extract, almond extract, or even a splash of coffee liqueur to the cream before whipping. Use a piping bag to create elegant swirls of flavored whipped cream atop your mousse cups for a professional touch.
3. Chocolate Shavings: Chocolate shavings add an extra layer of decadence. To make them at home, simply use a vegetable peeler to shave a chocolate bar. Ensure the chocolate is slightly warm for easier shaving, or use the back of a knife to create delicate curls. Scatter the shavings over the mousse just before serving for an impressive finish.
Exploring Variations of Chocolate Mousse
While the classic chocolate mousse is undeniably delicious, there are numerous variations to explore that can cater to different tastes and dietary preferences.
Different Types of Chocolate
Experiment with various types of chocolate to create unique mousse flavors. Milk chocolate will yield a sweeter, creamier mousse, while dark chocolate provides a rich and intense flavor. For a lighter alternative, try using white chocolate, which offers a sweeter profile that pairs well with citrus flavors. You can also explore flavored chocolate, such as orange-infused or mint chocolate, to add a twist to your dessert.
Incorporating Flavors
To take your chocolate mousse to the next level, consider incorporating additional flavors. A shot of espresso can deepen the chocolate flavor and add complexity. Similarly, a teaspoon of orange zest brings a refreshing citrus note that complements chocolate beautifully. For an adult-only version, consider adding a splash of your favorite liqueur, such as Grand Marnier or Baileys, to enhance the mousse’s richness.
Dietary Modifications
If you’re catering to specific dietary needs, chocolate mousse can be easily adapted. For a vegan version, substitute heavy cream with coconut cream and use dairy-free chocolate. Simply chill a can of full-fat coconut milk overnight, then scoop out the solidified cream and whip it as you would regular cream. For gluten-free options, ensure all your ingredients are certified gluten-free, which is often the case with good-quality chocolate.
The Art of Enjoying Chocolate Mousse Cups
To truly savor your chocolate mousse cups, consider pairing them with complementary flavors and creating a memorable dessert experience.
Pairing Suggestions
Enhance your dessert by pairing it with the right beverages. A glass of port wine or a rich red wine, such as a Cabernet Sauvignon, can complement the deep chocolate flavors. Alternatively, serve your mousse with a strong coffee or espresso to create a delightful contrast. For those who prefer non-alcoholic options, a rich hot chocolate or chai tea can be wonderful companions.
Creating a Dessert Experience
Make your chocolate mousse cups a centerpiece for gatherings or special occasions. Arrange them on a decorative platter, garnish with fresh fruits and herbs, and pair with small plates for a complete dessert experience. Consider offering a variety of toppings and garnishes in small bowls, allowing guests to personalize their mousse cups. This interactive element adds a fun touch to your serving style and encourages creativity.
Conclusion
In conclusion, creating decadent chocolate mousse cups is a rewarding and enjoyable experience that allows you to explore the world of flavors and textures. From the whipped cream incorporation to the careful chilling process, each step adds to the final delight of this classic dessert. Whether you’re sticking to the traditional recipe or experimenting with variations, the joy of serving a homemade chocolate mousse is unmatched.
Encourage yourself to try this recipe and explore your own variations. The possibilities are endless, from different types of chocolate to unique flavor infusions. The satisfaction of creating a dessert from scratch, especially one as indulgent as chocolate mousse, is a rewarding endeavor that you will want to share with friends and family. So roll up your sleeves, gather your ingredients, and get ready to impress with your very own chocolate mousse cups.