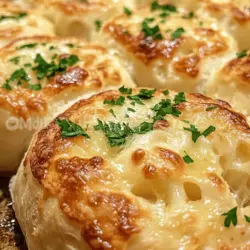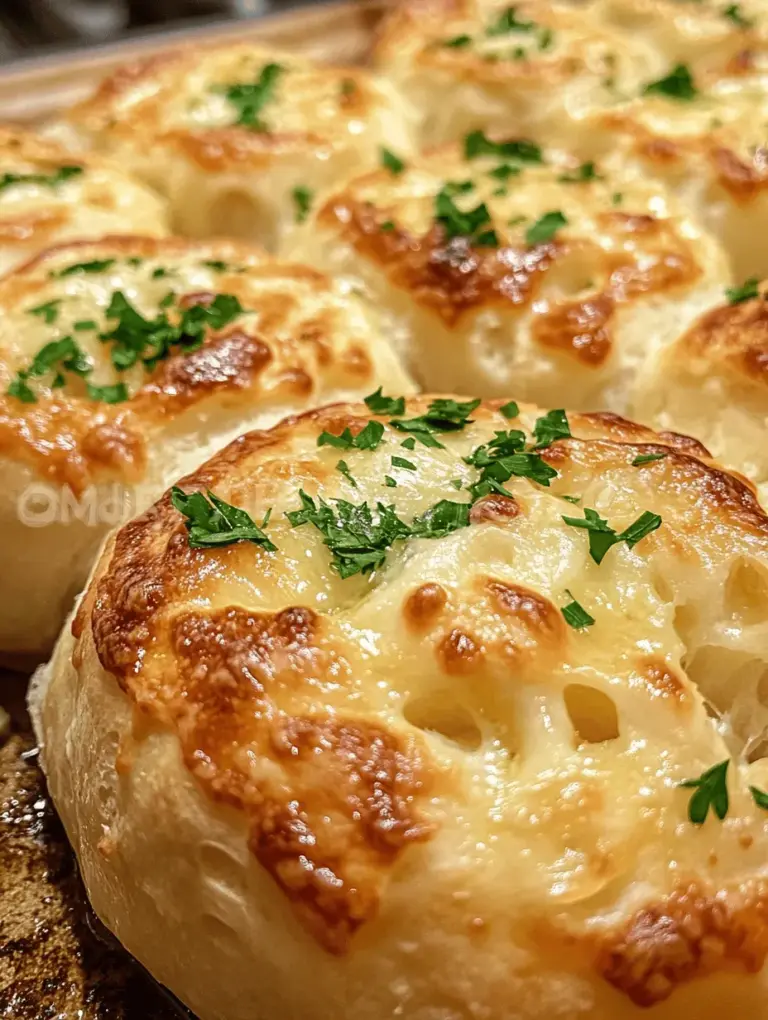
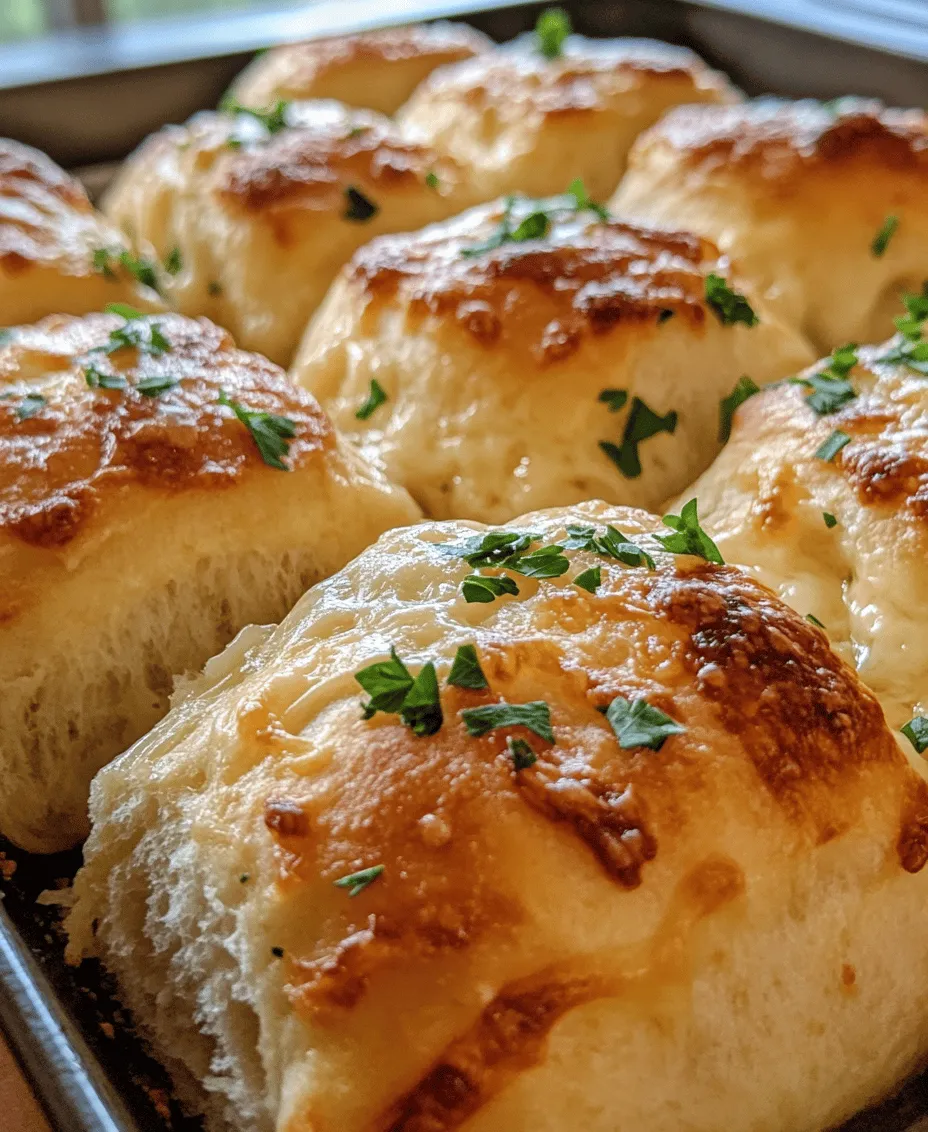
There’s something truly magical about the aroma of freshly baked bread wafting through your kitchen, especially when that bread is infused with the irresistible combination of garlic and gooey cheese. Cheesy garlic pull-apart rolls are the perfect embodiment of comfort food, making them an ideal choice for family dinners, casual gatherings, or even as an indulgent snack. These rolls not only deliver on flavor but also on the experience of sharing warm, homemade bread with loved ones. As you pull apart each soft, cheesy morsel, the joy of cooking and the satisfaction of creating something delicious become evident.
The allure of cheesy garlic pull-apart rolls lies in their simplicity and versatility. They can be served as a side dish for hearty meals, a delightful appetizer, or even as a standalone treat to enjoy with a warm bowl of soup. The combination of warm, melted cheese enveloped in soft, buttery bread, alongside the aromatic punch of garlic, makes for a truly irresistible treat. And the best part? Making these rolls at home is easier than you might think, requiring just a handful of ingredients and a little patience.
In this article, we will walk you through the essential ingredients that make up these delightful rolls, followed by a detailed step-by-step guide to ensure your cheesy garlic pull-apart rolls turn out perfect every time.
Understanding the Ingredients
Before diving into the preparation process, it’s essential to understand the ingredients that contribute to the delightful taste and texture of cheesy garlic pull-apart rolls. Each component plays a vital role in creating the perfect rolls that are fluffy, flavorful, and utterly satisfying.
All-Purpose Flour
All-purpose flour is the backbone of any bread recipe, providing the necessary structure and texture to the rolls. When mixed with water and yeast, the proteins in the flour form gluten, which gives bread its chewy texture. For cheesy garlic pull-apart rolls, using high-quality all-purpose flour will ensure that your dough is strong enough to hold the cheesy filling while remaining soft and tender.
Active Dry Yeast
Yeast is a crucial ingredient in bread-making, and active dry yeast is the most commonly used type. This ingredient is responsible for fermentation, which causes the dough to rise and develop its airy texture. When mixed with warm milk and sugar, the yeast activates and begins to produce carbon dioxide, which creates small bubbles in the dough. This process is essential for achieving fluffy, pull-apart rolls that are light and tender.
Warm Milk and Sugar
Warm milk serves two primary purposes in this recipe. First, it provides moisture to the dough, and second, it helps activate the yeast when combined with sugar. The sugar acts as food for the yeast, promoting fermentation and enhancing the overall flavor of the rolls. This combination creates a rich, slightly sweet dough that perfectly complements the savory garlic and cheese filling.
Butter
Butter is a key ingredient that adds richness and flavor to both the dough and the filling. It contributes to the tenderness of the rolls, making them soft and indulgent. When melted and brushed over the finished rolls, butter also provides a beautiful golden color and a deliciously rich taste that elevates the overall experience.
Garlic Powder and Cheeses
Garlic powder is the star seasoning in these rolls, imparting its distinctive flavor throughout the dough and filling. Combining garlic powder with a blend of mozzarella and Parmesan cheese creates a melt-in-your-mouth experience with each bite. Mozzarella offers a gooey, stretchy quality, while Parmesan adds a sharp, savory note that perfectly balances the richness of the butter and the softness of the bread.
Salt, Black Pepper, and Fresh Parsley
Seasoning is crucial in any recipe, and cheesy garlic pull-apart rolls are no exception. Salt enhances the overall flavor and brings out the sweetness of the dough, while black pepper adds a subtle kick. Fresh parsley not only adds color but also a fresh, herbal note that brightens the rich flavors, making each bite a delightful experience.
Step-by-Step Instructions for Preparation
Now that we’ve covered the essential ingredients, let’s dive into the preparation process for your cheesy garlic pull-apart rolls. Following these detailed steps will ensure that you achieve perfect results every time.
Activating the Yeast
The first step in making cheesy garlic pull-apart rolls is to activate the yeast. This process is crucial as it ensures that your dough will rise properly. In a small bowl, combine warm milk (around 110°F or 43°C) and sugar, then sprinkle the active dry yeast over the top. Allow it to sit for about 5-10 minutes until it becomes frothy and bubbly. This indicates that the yeast is active and ready to be incorporated into the dough.
Preparing the Dough
Once your yeast is activated, it’s time to prepare the dough. In a large mixing bowl, combine the all-purpose flour and salt. Make a well in the center, and pour in the activated yeast mixture along with melted butter. Stir the mixture until it begins to come together into a shaggy dough. The dough should be moist but not sticky. If needed, add a little more flour, a tablespoon at a time, until the desired consistency is achieved.
Kneading Techniques
Kneading is an essential step in developing gluten, which gives bread its structure and chewiness. Transfer the dough onto a lightly floured surface and begin kneading by pushing the dough away from you with the heel of your hand, then folding it back toward you. Rotate the dough a quarter turn and repeat this process for about 8-10 minutes, or until the dough is smooth and elastic. If the dough sticks to your hands or the work surface, sprinkle a little more flour as needed.
First Rise
Once your dough is kneaded to perfection, it’s time for the first rise. Shape the dough into a ball and place it in a lightly greased bowl, turning it to coat all sides with oil. Cover the bowl with a clean kitchen towel or plastic wrap, and let it rise in a warm, draft-free area for about 1 to 1.5 hours, or until it has doubled in size. Ideal rising conditions are around 75°F to 80°F (24°C to 27°C).
Preparing the Filling
While the dough is rising, you can prepare the cheesy garlic filling. In a mixing bowl, combine the mozzarella and Parmesan cheeses, garlic powder, black pepper, and finely chopped fresh parsley. Mix well until all ingredients are evenly distributed. This filling is what will make your pull-apart rolls incredibly flavorful, so be sure to combine it thoroughly.
Shaping the Rolls
Once the dough has completed its first rise, punch it down gently to release the air. Turn the dough out onto a lightly floured surface and roll it into a rectangle about 1/2 inch thick. Using a sharp knife or a pizza cutter, cut the dough into squares (approximately 3×3 inches). Take each square and place a generous spoonful of the cheese filling in the center. Fold the corners of the dough over the filling to create a pocket and pinch the seams to seal them tightly.
Second Rise
After shaping all the rolls, place them seam-side down in a greased baking dish, ensuring they are close together but not touching. Cover the dish with a kitchen towel and let the rolls rise again for about 30 to 45 minutes, or until they have puffed up and nearly doubled in size. This second rise is crucial as it enhances the texture of the rolls, making them even more fluffy and tender when baked.
By following these initial steps, you are well on your way to creating delicious cheesy garlic pull-apart rolls that are sure to impress your family and friends. The combination of warm bread, melting cheese, and aromatic garlic will make these rolls a favorite at any gathering. Stay tuned for the next part, where we will explore the baking process and additional tips to ensure your rolls come out perfectly golden and irresistibly delicious.
Baking the Rolls
Baking cheesy garlic pull-apart rolls to golden-brown perfection relies heavily on the correct oven temperature and timing. Preheat your oven to 375°F (190°C). This temperature is ideal for achieving that crispy exterior while allowing the inside to remain soft and chewy. When the rolls are ready, they should be a beautiful golden brown; if they start browning too quickly, you can tent them with aluminum foil to prevent burning while allowing the insides to continue baking.
The baking process typically takes about 20-25 minutes. Keep a close eye on them during the final few minutes, as ovens can vary, and you want to ensure they don’t overbake. A quick tap on the top of the rolls should yield a hollow sound when they are finished, indicating that they are cooked through.
Tips for Achieving the Perfect Texture
Dough Consistency
Achieving the perfect dough consistency is crucial. Depending on the humidity levels in your kitchen, you might need to adjust the amount of flour used. If it’s a particularly humid day, the flour may absorb more moisture, resulting in a wet dough. If this happens, gradually add additional flour—one tablespoon at a time—until you reach a smooth, elastic texture that doesn’t stick to your fingers. Conversely, on drier days, you may find that you need slightly less flour. The key is to aim for a dough that’s soft and slightly tacky but not overly sticky.
Rising Conditions
The rising of the dough is just as important as the mixing. Find a warm spot in your kitchen for the dough to rise. An ideal location is near the oven while preheating or in a sunny spot. If your kitchen is particularly cool, consider turning on the oven to the lowest setting for a few minutes, then turning it off, and placing the dough inside to rise. Cover the dough with a clean kitchen towel to keep it warm and to prevent it from drying out. A good rise generally takes about one hour or until the dough has doubled in size.
Baking Techniques
To achieve that desirable contrast of a crispy exterior and a soft, cheesy interior, consider a few baking techniques. First, place the rolls in a greased baking dish, ensuring they are snug but not overly cramped. This will allow them to rise together and form a cohesive pull-apart loaf. Another technique is to brush the tops of the rolls with melted butter before baking; this will enhance browning and add flavor. For an extra layer of texture, sprinkle some sea salt on top before placing them in the oven.
Creative Variations on the Recipe
Once you’ve mastered the basics of cheesy garlic pull-apart rolls, don’t hesitate to get creative with variations.
Cheese Alternatives
Switching up the cheese can add a new dimension of flavor to your rolls. While mozzarella is a classic choice for its meltiness, consider using sharp cheddar for a bolder taste, creamy gouda for a smoky flavor, or even a mix of cheeses for a gourmet twist. Fresh ricotta can also be a delightful addition, providing a creamy texture that pairs beautifully with garlic.
Herb Infusions
For those looking to elevate their rolls, incorporating fresh herbs is an excellent way to enhance the flavor profile. Finely chop fresh herbs such as rosemary, thyme, or parsley and mix them into your dough or sprinkle them between layers of dough before baking. Not only do these herbs add flavor, but they also provide a beautiful visual appeal.
Add-Ins
Consider adding sun-dried tomatoes for a tangy bite or cooked bacon bits for a savory crunch. These additional ingredients can introduce complex flavors and textures that make your cheesy garlic pull-apart rolls even more irresistible. Just be cautious not to overload the dough, as too many add-ins may affect the rolls’ ability to rise.
Serving Suggestions and Pairings
Cheesy garlic pull-apart rolls are incredibly versatile and can be enjoyed in a multitude of ways.
Accompaniments
These rolls pair beautifully with a variety of dips and sauces. For a classic touch, serve them with warm marinara sauce for dipping. Garlic butter, made by melting butter and infusing it with minced garlic and herbs, is another excellent choice that enhances the rolls’ flavor. For a lighter option, pair them with a fresh salad dressed in a simple vinaigrette to balance the richness of the rolls.
Occasions
Cheesy garlic pull-apart rolls are perfect for numerous occasions. They make an excellent side dish for family dinners, complementing hearty meals such as roasted chicken or pasta. During festive gatherings, they can serve as an appetizer that encourages sharing and conversation. Whether it’s a cozy weeknight dinner or a holiday feast, these rolls will surely be a crowd-pleaser.
Storing and Reheating Leftovers
If you find yourself with leftover cheesy garlic pull-apart rolls, proper storage is key to maintaining their freshness.
Storage Tips
To store leftover rolls, allow them to cool completely at room temperature. Once cooled, place them in an airtight container or wrap them tightly in plastic wrap. They can be stored at room temperature for up to two days. If you want to keep them longer, consider freezing them. Individual rolls can be frozen in a single layer on a baking sheet before transferring them to a freezer-safe bag; this prevents them from sticking together.
Reheating Methods
When you’re ready to enjoy your leftovers, reheating them properly will help maintain their original texture and flavor. For best results, preheat your oven to 350°F (175°C). Place the rolls on a baking sheet and cover them loosely with aluminum foil to prevent over-browning. Heat for about 10-15 minutes, or until warmed through. You can also reheat them in the microwave, but be cautious, as this method may make the rolls chewy. If using the microwave, heat them in short intervals of 10-15 seconds until warm.
Conclusion: The Joy of Homemade Cheesy Garlic Pull-Apart Rolls
Creating cheesy garlic pull-apart rolls at home is a rewarding endeavor that fills your kitchen with delightful aromas and brings warmth to any gathering. The satisfaction of pulling apart a warm, cheesy roll and experiencing the buttery garlic flavor is truly unmatched. Baking is not just about creating delicious food; it’s about sharing experiences and memories with loved ones.
So, roll up your sleeves, gather your ingredients, and dive into this delightful recipe. Whether you’re enjoying these rolls with a casual meal or impressing guests at a dinner party, they are sure to be a hit. Enjoy the joy of homemade goodness and the smiles it brings to your table.